Ingredients:
- 2 pounds cassava (aka yuca..you can find this in the produce section or freezer aisle-peeled version), peeled and cut into short lengths
- 1 tablespoon salt
- water (enough to submerge the cassava pieces)
- 1 cup sweetened condensed milk
- 1/2 cup butter (softened, NOT melted in liquid form, no, no, no!)
- 1 cup American processed cheese, shredded
- more butter for serving (i prefer margarine though, it tastes closer to how i'm used to)
Steps:
1. Remove the skin.
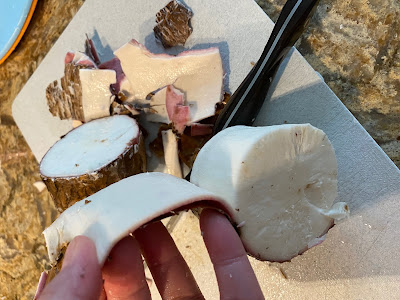
Tip: Cut the cassava/yuca in small pieces then let the knife cut through the cassava deep enough that it breaks the first layer. Once you break this layer you can just peel it off like a banana. Well, sort of. The skin is really hard and the smoother that piece is, the easier to peel.
 |
| cut through as deep as you can |
 |
| peeling is easier after that first step |
2. Brush sides and bottom of a baking dish with softened butter or margarine and set aside.
3. In a pot over medium heat, combine cassava, salt, and enough water to cover. Bring to a boil and cook, uncovered, for about 15 to 20 minutes or until very tender.
4. Once it's soft drain the liquid right away. RIGHT AWAY. I made the wrong decision of letting it sit in the liquid for too long that the cassava started absorbing the liquid and my nilupak turned into the texture of a mashed potato. You don't want it to be that soft. You should be able to spread the butter (or in my case, margarine) on top of it without the brush mixing (fine, "sinking") into your nilupak.
5. Remove the tough, stringy core and discard. You might need to do this while you're mashing your cassava pieces too. Remove all hard to mashed parts too.
6. Using your potato masher (you can use your hand mixer too), mash boiled cassava until free of lumps. You might need to use your hands too for hard to mash pieces.
 |
| don't worry if it's too dry..it should be at this point |
7. In a bowl, combine your mashed cassava, condensed milk, and softened butter. Fold until smooth and creamy. If you're not sure how to fold, just gently stir to make sure the butter and condensed milk are equally distributed in your mashed cassava.
8. Transfer mixture into the prepared baking dish. Or if you're feeling up to it, take out your piping bag and pipe your nilupak into your prepared baking dish. That's only for aesthics though. You really don't need to do that.
Tip: Or you can do what I did, I spread half of my mixture into the pan and piped the the rest.
Tip again: But if you're feeling lazy but still want it to look aesthetically pleasing, run the tines of a fork on the surface to make decorative lines.
9. You're done at this point. To serve cut a piece from your pan, spread butter on top and sprinkle with cheese. Or you, can do this on the whole pan itself, like what I did.
Side Story:
This is one of my favorite snacks back in highschool.
The more margarine the better.
This is one of those street food sold by sidewalk vendors in front of schools or near jeepney stations.
The fancier version would have a layered nilupak with 3 different colors, purple, yellow and cream.
I haven’t had this since after highschool and I just chance upon this while I was at a Filipino store an hour away from me. I got the last container.
I like it so much that a few days after finishing it I was craving for more and like anything else in this blog, I learned to make this out of necessity (yes, that word again,lol... see my “who am i” section if ur curious).


0 comments